> For the complete documentation index, see [llms.txt](https://guides.tability.io/docs/llms.txt). Markdown versions of documentation pages are available by appending `.md` to page URLs; this page is available as [Markdown](https://guides.tability.io/docs/become-a-tability-power-user/integrations/jira.md).
# Jira
Sync Tability initiatives with your Jira tickets
## Overview
You can connect your Tability workspace to a Jira instance to:
* Attach Jira issues to outcomes/key results in Tability
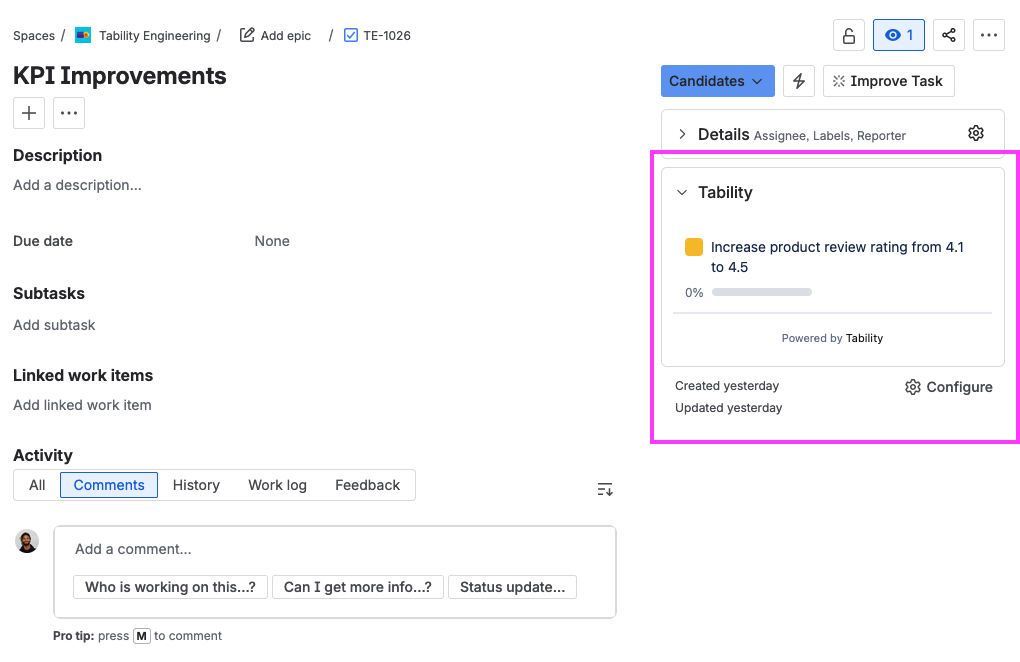
* See the outcomes/key results related to a specific issue in Jira
* Use Jira as a data source
## How to connect Tability to Jira
### Installing the Tability app in Jira
1. Find the [Tability app](https://marketplace.atlassian.com/apps/1228182/tability-okrs-goal-tracking-for-jira) in Atlassian's Marketplace
2. Install the Tability app on your Jira instance
3. Configure the integration
### Configuring the Tability app in Jira
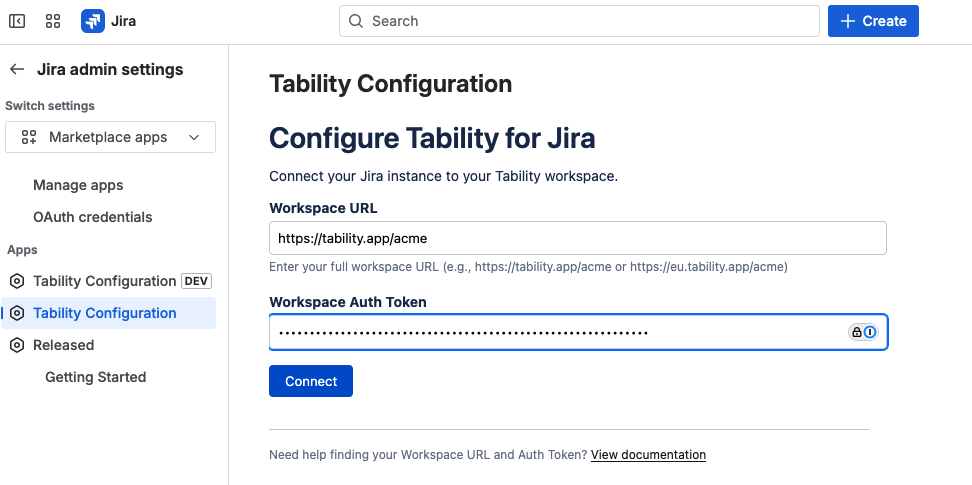
After installing the app in Jira, go to the configuration panel of your application.
You will need 2 things to configure your workspace:
* **Workspace URL:** the URL of your workspace, including the domain (ex: , or )
* **Workspace auth token:** the secret auth token of your workspace
You can find your **workspace auth token** by going to your **Workspace Settings** page in Tability.
## Using the Jira integration
### How to sync Jira issues in Tability
1. Click on an issue
2. Copy the issue link
3. Open Tability to add an initiative/task
4. Paste the issue link in the input field
Tability will keep the Jira status in sync, and you'll be able to see an up-to-date state of the work in Jira without having to leave Tability.
### How to see all the outcomes/key results related to a specific Jira issue
First, you need to complete the steps in [#how-to-sync-jira-issues-in-tability](#how-to-sync-jira-issues-in-tability "mention") to connect your Jira issues to outcomes/key results.
Then, within Jira, all the KRs related to a specific issue will be listed under the corresponding issue context panel.
### How to use Jira as a data source
You can use Jira as a data source to automatically pull the number of Jira issues corresponding to a specific JQL request.
**Step 1. Open up the edit panel of your outcome/KR**

Click on "Edit" to open up the Edit panel of any outcome/KR in your workspace.
**Step 2. Select Jira as a data source**
Go to the "Data source" tab and select Jira.
**Step 3. Add your JQL**
Add your JQL query in the input field, then click on **Save & preview** to complete the connection.
Tability will retrieve the current value for that metric and your screen should look like this 👇
You can now toggle the option to **Enable auto-sync** of your metric if you're on a Premium subscription.
Tability will retrieve the value of your metric from Jira every 48h and will create a check-in on behalf of the owner of the outcome/KR.
The first data sync should happen within 1h of enabling this option.
### How to use the data source in your check-ins
It's all automatic! Once an outcome/KR is connected to a data source, Tability will automatically pull the current value whenever you open up the check-in modal.